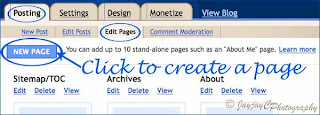
This was something that I had desired for my blogspot blogs for a long time, something similar to the pages seen in Wordpress-powered websites, like my garden blog here. Pages, whose tabs are normally placed strategically below the blog's header for easy access, is a great way to highlight important or essential information about your blog. Pages such as About, Contact, Archives, Sitemap and Blog List are the norm, beside Categories, Products, Services and others...the endless choices are yours to create! Nevertheless, bear in mind that Blogger allows only 10 stand-alone pages per blog. Pages and posts are quite similar except the former are not included in the blog's archives and feeds.
Prior to the introduction of this new feature, some bloggers (me included) used to create 'static pages' by doing backdated blog posts and then, linking to them by configuring the blog's template as shared by Amanda Fazani at BloggingTips. No longer do you need to follow this merry-go-round route UNLESS you desire more than the 10-pages limit that Blogger provides. That's my humble opinion!
Okay, here's the easy and simple way on
how to create Pages in Blogger Blogs:
- Login to your Blogger Account. At Dashboard, click Edit Posts, which will then open the Posting tab.
- Choose Edit Pages below the Posting tab.

- Click on the New Page button and the new page editor will open for you to create a page. It is similar to how you create a blog post, except the page title should be ideally short as that serves as the page's tab or link on your blog. When you're done with composing, click on Post Options to select your choice on comments, etc. Next, click the Publish Page button to publish and exit.

- If this is the first time you're creating a page, an Add Page List Gadget window pops up to ask whether you'd like to add the Pages gadget (widget) in your Blog's sidebar or Blog tabs at the top of your blog or otherwise.

After selecting your choice, click Save and Publish, and View Page. That's all to it!
Hooray, you've created your first page!
- You can configure the Pages widget anytime you wish. Go to Design (previously known as Layout) | Page Elements, then locate the Pages widget - click the Edit link to choose which Pages you want shown, change their order and so forth. Then, click Save to exit.

- If you want to reposition your Page Tabs below your blog's header to appear as List of links at the sidebar instead or vice versa, just return to Design | Page Elements and locate the Page gadget. Simply click and drag it to reposition as you wish.

- You can change the font colour and style of the Pages tabs/links if you wish by editing your blog's template. Stay tuned...I'll try to share how-to in my next post!....
Done, check this out!
Check out these related posts:
Keep learning~~keep smiling~~keep sharing!

 Email
Email

Hi Jacqueline! I love your tips! You have done a great job in this blog! I wanted to ask you how i can make a page title to be a direct link. I mean when you press it to act as a link and redirect you somewhere else.
ReplyDeleteThanks for the thumbs-up, cinejunky!
ReplyDeleteI'm unsure what exactly you want? I just experimented creating the Page title as a link (the same as you'd create any link - a tutorial here). But, take note that the same 'link text' will appear both in the Page Tab and Page Title. This can be confusing to your readers who will be linked first to your Page and only if they click on the Page Title will it direct them to the site intended, not otherwise.
You may prefer to use a HTML/Javascript gadget to create a direct link instead and locate it wherever you wish.
Hope this helps?
I will look into it thanks for your time!
ReplyDeleteYou're most welcome, cinejunky!
ReplyDeleteThanks for signing in as my blog's follower. :)
Thank you so much for sharing a great information.
ReplyDeleteLana
The pleasure is all mine, Lana!
ReplyDeleteI came to your site through google forum. Its so beautiful. It yells out serenity:).
ReplyDeleteYour sweet words are music to my ears, SS! Thanks for making my day. God bless you! :-)
ReplyDelete