
 RSS
RSS Email
Email "
"But now, with the long list of font choices made available, changing the font style and appearance of the page tabs would be a breeze! You will be spoilt with choice!

No need at all to edit the HTML of our blog's template as previously mentioned at my earlier tutorial or to tackle with custom CSS codes. Thus, I felt it'll be good to present an updated tutorial because there may be many bloggers (like me, previously) who are not aware of these high-quality, open-source web fonts that are offered by Blogger at the Template Designer.
Many thanks to the Blogger Team and the Google Web Fonts Team who have made it so simple and easy for us.
For Blogger blogs, follow these easy steps below on
how to change the font style and appearance of Page Tabs
(by selecting your preferred font family, size, style and color,
at your blog's Template Designer, using Blogger's new user interface)
- Log in to your Blogger account.
- Click either on Your Blog's Name or on the Dropdown Menu next to the Post List icon and select Template.

- At the Template page, click the Customize button below the Live on Blog image to go to Template Designer.

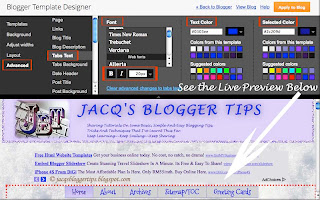
- At the Template Designer page, click Advanced | Tabs Text submenu to choose your preferred font style (so many font choices), to bold or to italicize and to select your font size. Here too, you can change the text color and the color of selected tab. As you make your changes, check out the results in the live preview in the lower pane to help you decide.
(Note: If you had previously added custom CSS codes related to the above, it has to be removed first to enable this to work.)
- Next, change the appearance of the Page Tabs or Pagelist by clicking the Tabs Background submenu. It will enable you to choose your page tabs' background, selected and border colors.
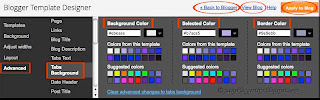
- When you're finally satisfied with your choices or changes, just click the Apply to Blog orange button to save changes, and the View Blog link to view them or the Back to Blogger link to exit the Template Designer.


That's all, enjoy!
Check out Greenlava's article at Blogger Sentral to get further insights on how to change other elements of the Page Tabs or Pagelist - there's much to learn, especially from the comment section where he gave solutions to problems encountered by some bloggers. God bless you, Greenlava, for your generosity!
 "Keep learning~~keep smiling~~keep sharing"

Hi Jacqui, i just saw this blogsite. You have many blogs, i wonder how you were able to manage all of them. I know you are very good with computer techniques, so i think i have to be here often to at least be aware of some possibilities, or maybe ask you questions. I am not good in following computer instructions, as you noticed with my boring blogsite! hahaha. regards.
ReplyDeleteLovely to see you here, Andrea, and thanks for following... hope you'd not be disappointed. Here, I just share some blogging techniques I've acquired along the way and to keep a record too, being fully aware that they will come in handy should my memory fails.
ReplyDeleteFrankly, it's not easy to manage my blogs, though few in number, it's really time consuming and at the expense of my other interests/enjoyment, like visiting other gardening blogs and reading.
You're too modest... in my opinion, your blog's articles are superb, never boring - these are what draw readers, not the 'decor'.
Happy learning and blogging, Andrea!
Greetings from California.
ReplyDeleteGood tip! Thanks :-)
I am Your Newest Follower.
I invite you to visit My Blog
Have a Nice Day :-)
Thanks for your encouragement and for following, Ron! I appreciate that very much. You have a lovely day too and all the best for a joyful, successful and healthy new year 2012. God bless. :-)
ReplyDeleteI appreciate your post, and I wish it were this easy for me. However, I've set up a Pages list and can see the links underneath my header. However, when I go into the Advanced menu mentioned here, I do not get an option for Tab Text. Something about my template is not getting "Tab Text" recognized as a customizable element.
ReplyDeleteHi JL! I checked your blogs and noticed that you're still using the old Layout Ttemplate, Minima. You need to upgrade to Blogger Template Designer if you wish to have the latest features and options. If interested, check it out at http://buzz.blogger.com/2010/06/blogger-template-designer-now-available.html. My article at http://jacqsbloggertips.blogspot.com/2010/07/my-designer-blog-with-blogger-template.html may be helpful too.
DeleteThank you so much, great post!!
ReplyDeleteThanks for your positive response, tao.owl! Much appreciated.
DeleteLove this site..its fab!
ReplyDeleteTho I've noted font options doesn't appear under-advanced/blog description..
I'm using simple template btw..
best from blighty!
Thanks Kat... your kind appraisal make my day! :)
DeleteSince font options for blog description is unavailable for Simple Template, then you have to add some CSS codes if you desire to change its font.
Cheers!
Thank you so much! :D
ReplyDeleteRosie. x
My pleasure in sharing, Rosie!
DeleteOkay, I know how to do that, but do you know how I can change the text to a font that isn't in the little selector thing? And if I do manage it, will the font show up on other computers, even if they don't have the font installed on their computer?
ReplyDeleteThanks!
Sorry, this is out of my league!
DeleteI am having some trouble...I have successfully changed my blog title fonts and my widget title fonts; however, the problem is this: when you visit my page, you see the fonts scroll through and change from font to font (all the ones I tried previously) until they finally land on the current setting. Help!
ReplyDeleteLeah Pratt, you've solved your problem, right? I visited your blog and saw that the fonts are static. Anyway, your problem is out of my league and am sorry, I'm unable to assist.
DeleteThank you friend the tutorial given above is very explanatory.
ReplyDeleteYou're most welcome, Malik! Great to know that you've found the tutorial helpful.
DeleteThe tricks is so cute, I want to experiment font color and style of my blog. I can imagine my blog will look so cute than before thanks for sharing us this kind of tricks, this is very helpful.
ReplyDeleteCheers,
Hazel
Blogging Profits Unleashed
^_^
Great to know the tutorial was helpful. All the best in your experiment, Hazel!
DeleteYou are awesome! I followed your font techniques on my blog www.hadapsar.co.cc. Thanks for share
ReplyDeleteMy pleasure in sharing. I'm delighted to know that you're happy with the results, Imran.
DeleteVery good tutorial.
ReplyDeleteI have discovered, however, that the tabs text resorts to default size and font when placed on the sidebar.
Just a note.
Best,
Deborah
Thanks for the compliment and note, Deborah! Much appreciated.
DeleteThanks for this tutorial.Very helpful.
ReplyDeleteThank you for your thanks, Debarpan... great to know it was helpful for you.
Delete