
 RSS
RSS Email
Email "
"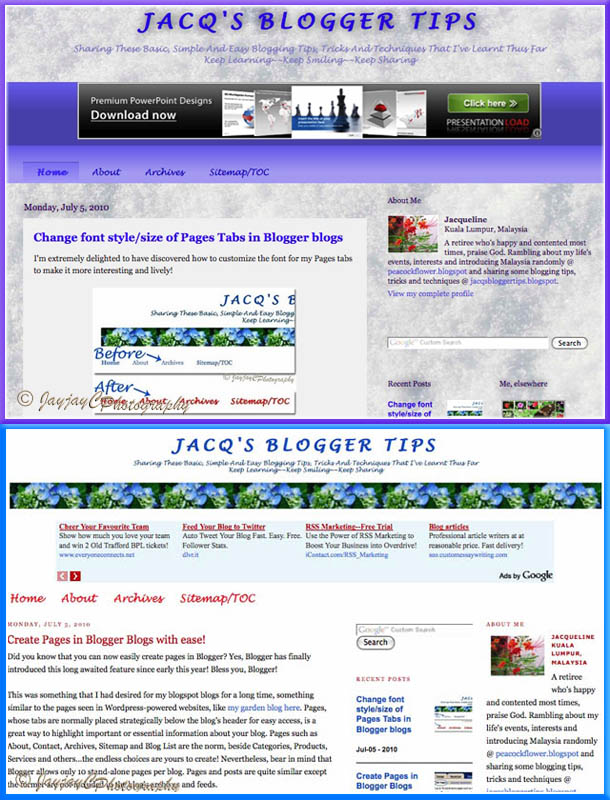
The new template designer blog above and the old layout template below
The new Template Designer has such an extensive array of beautifully designed Templates, with mix and match Background images to 'whet your appetite' and stimulate your creative juices. Create your dream online home and express them in your blog with the various Layout options, from one to three columns, then customize and colour it to your heart's content with the Advanced tools for fonts, links, tabs, gadgets and so forth, which replaces the previous 'Font and Colour' feature at Layout. Simply awesome!
Learn how to design and personalize your blog from Blogger Help and watch its introduction at YouTube. Nonetheless, take note that if you choose to apply it to your current blog, all of your customization existing now will be erased though your gadgets are retained. So, be sure to first save the current template by going to Design | Edit HTML, and Download Full Template.
Though fully aware that all the customization done in my previous template will go up in smoke, I applied the new Template Designer to this blog, regardless. And consequently, followed with another 1½ days of cracking my dummy non-technical head to tidy up the loose ends where all the gadgets and others were in disarray! I'm glad that I've shared some HTML/CSS tutorials in this blog and by referring to my resources here, as well as making comparisons between the new and old templates, I've finally got my dream house in order!
Hehe...what do you think, cool and chic, right? I've chosen the template from Awesome Inc. and match with image A330Pilot (textures) for its background. Thought it conducive to have a soothing ambience for visiting readers who arrived here for a learning experience and not be distracted with glaring background images.
Here are a few tips and tricks that I've successfully experimented in the process of learning how to customize the template for my newly designed blog, to look as I desire after applying the Blogger Template Designer. I'm by no means an expert, but learning the hard way and sharing here just in case other bloggers may encounter quite similar problems and searching for solutions. Changes below were specifically made to suit my taste but you can adapt accordingly to your blog. At least you have some clues and ideas here to guide you now, I hope.

You need to edit your blog's template by going to Design | Edit HTML to make the necessary customization, remembering first to save your current template.
Alternatively, if you're familiar with CSS (cascading style sheets), you can add custom CSS codes to your template by going to Design | Template Designer | Advanced | Add CSS. Learn more at Blogger Help.
A. Header
- How to center-align text for blog title/description:
Find the following code:
/* Header

----------------------------------------------- */

.header-outer {

margin: $(header.margin.top) 0 $(header.margin.bottom) 0;

background: $(header.background.color) $(header.background.gradient)

repeat scroll 0 0;

}
Replace with:
/* Header

----------------------------------------------- */

.header-outer {

margin: $(header.margin.top) 0 $(header.margin.bottom) 0;

background: $(header.background.color) $(header.background.gradient)

repeat scroll 0 0;

text-align: center;

}
- How to change the font family/style/size for blog title:
Find the following code:
.Header h1 {

  font: $(header.font);

  color: $(header.text.color);

  text-shadow: 0 0 $(title.shadow.spread) #000000;

}
Replace with:
.Header h1 {

  text-transform:uppercase;

  letter-spacing:.1em;

  font-family:"Lucida Handwriting", cursive;

  font-size:250%;

  color: $(header.text.color);

  text-shadow: 0 0 $(title.shadow.spread) #000000;

}
- How to change the font family and style for blog description:
Find the following code:
.Header .description {

  font: $(description.font);

  color: $(description.text.color);

}
Replace with:
.Header .description {

  text-transform:capitalize;

  font-family:"Lucida Handwriting"
, cursive;
color: $(description.text.color);
}
- How to change the font for tabs:
Find the following code:
font: $(tabs.font);

color: $(tabs.text.color);
Replace with:
font-family:"Lucida Handwriting", cursive;
color: $(tabs.text.color);
- How to remove border and shadow from images in post:
Find the following code:
.post-body img {

  padding: 8px;

  background: $(image.background.color);

  border: 1px solid $(image.border.color);


  -moz-box-shadow: 0 0 $(image.shadow.spread) rgba(0, 0, 0, .2);

  -webkit-box-shadow: 0 0 $(image.shadow.spread) rgba(0, 0, 0, .2);

  box-shadow: 0 0 $(image.shadow.spread) rgba(0, 0, 0, .2);
Replace with:
.post-body img {

  padding: 0px;

  background: transparent;

  border: none;


  -moz-box-shadow: none;

  -webkit-box-shadow: none;

  box-shadow: none;
- How to change/reduce the font size in post footer:
Find the following code:
.post-footer {

  margin: 1.5em 0 0;

}
Replace with:
.post-footer {

  margin: 1.5em 0 0;

  font-size:85%;

}
- How to center-align text and change/reduce the font size:
Find the following code:
.footer-outer {

  margin: -$(shadow.spread) 0 -1px;

  padding: $(shadow.spread) 0 0;

  color: $(footer.text.color);

  overflow: hidden;

}
Replace with:
.footer-outer {

  margin: -$(shadow.spread) 0 -1px;

  padding: $(shadow.spread) 0 0;

  text-align: center;

  font-size:90%;

  color: $(footer.text.color);

  overflow: hidden;

}
- How to change/reduce the space height between widgets (gadgets) :
Though Blogger applies a 30px top and bottom margin on all widgets, you can override that. Go to Design | Template Designer | Advanced | Add CSS and enter this code, where the 15px value stated below can be changed as you like:
.widget {margin:15px 0;}
(Thanks to GreenLava for responding to my question at Blogger Help Forum. I noticed that this code above only reduces or shorten the height between those gadgets below the header, blog post and footer sections, but not those at the sidebars. For specific widgets at footer, the code is as below and for those at the sidebars, refer to sub-item F. 3. below).
Nevertheless, I wanted the distance in height between specific widgets at the footer (the last 3 bottom-most horizontal ones) be reduced further. Googling for answers led me to clues by spavel, found here, and the following CSS were added that finally presented the gadgets as I wish:
#HTML3,#HTML4,#Attribution1 {margin:2px;}
(Tip: To identify your gadget or widget names, go to Design | Page Elements, and mouse over the gadget's Edit link. The widgetId can be read on the browser's status bar. Example widgetId=HTML3 will be referred to #HTML3 in the CSS. You can group the gadget # [each gadget is followed by a comma, except for the last one] like I did above or make a style for each gadget.)
- How to center-align the widget (eg. adsense widget):
Find the following code:
<div class='region-inner tabs-inner'>
Replace with:
<div class='region-inner tabs-inner' style="text-align: center;">
- How to change the top margin for the topmost widget:
(so that it is lower than the post date on its left)
Find the following code:
<Variable name="widget.outer.margin.top" description="Widget Top Margin" type="length" default="0" value="-3.3em"/>
Replace with:
<Variable name="widget.outer.margin.top" description="Widget Top Margin" type="length" default="0" value="0em"/>
- How to restyle/transform widget title to 'uppercase' at the sidebar:
Go to Design | Template Designer | Advanced | Add CSS and enter this code:
.sidebar .widget h2 {text-transform:uppercase;}
- How to change/reduce the space height between gadgets at the sidebar:
Go to Design | Template Designer | Advanced | Add CSS and enter this code, where the 0px value stated below can be changed as you like:
.sidebar .widget {padding-bottom:0px;}
- my signature? - so, took the opportunity to create a new one by referring to my tutorial here.
- labels shown as list? - hence, revisited my tutorial on how-to create a dropdown labels menu to make one again.
- google analytics? - checked Analytics Help to learn how to locate the code and reinsert in template .
Other helpful links:
Keep learning~~keep smiling~~keep sharing!!
Update: September 28 2010
Do hop over to my other tutorial, "Add CSS in the Template Designer to restyle your blog's appearance" which is a quicker and easier alternative!
Future template customization and CSS addition to this blog, if any, will also be updated and included here from time to time!
New additions:
- July 15 2010 - Added the 'AddThis share buttons' at sidebar (add a gadget) and below blog posts (to customize at template). Check at AddThis website to know more.
- July 18 2010 - Added the 'Related Posts' widget by Aneesh of BloggerPlugins below my blog posts. About a month later, replaced this with another widget, 'Related Posts with thumbnails'.
- January 5 2011 - Customize and style the 'Read More' link.
- April 1 2011 - Added Numbered Page Navigation


Wow, so cool and soothing, perfect for this blog! Good job!
ReplyDeleteThanks, my dear! Wouldn't you like to design anew your blog too? Probably, play around when you're free and do not click the orange button, Apply To Blog, unless you're ready to accept the transformation! Revert to me if you need help!
ReplyDeletehi mam, in your blog's bottom there is link to home, about, sitemap after copywrite message. i request you to publish a post to create as like it...
ReplyDeleteHi Thandapayal,
ReplyDeleteSharing briefly below how it can be done:
First you need to create a copyright gadget for your footer. Then, besides the copyright message, just continue to add the URL of your blog's Pages as links.
Check out my related tutorials here as a guide:
1. How to add a copyright notice.
2. How to create a link.
thanks...
ReplyDeletehi, i need a help from you. if you know the solution help me.
i want to display the number of the post before each and every post title in blogger. That is, suppose I have posts starting from A like A,B,C,D etc...i want to display number 1 before the post title A, number 2 before the post title B, number 3 before the post title C and so on...if u know the solution email me please...help me...
if you know publish a post for this...
The only way that I can think of is just edit each post already published and type in the number you want at the Title field, before your post title.
ReplyDeleteThanks for the HTML help there. I was confused earlier as to how to center the blog's title and description :)
ReplyDeleteThanks a lot!
N
You're most welcome, Nothingman! Great to know that the tutorial had helped you. :)
ReplyDeleteHi
ReplyDeleteFirst of all, great job man. Thanks.
I had a query.
How do I change the colour of each letter of my blog title. Like in google.
For ex, if my blog title is ABCD, then how would i make A-blue, B-green , C-red , D-Yellow
Thanks.
You're welcome, Rahul though I'm sorry to say that I've no idea at all how to differently color each alphabet of the blog's title!
ReplyDeleteAWESOME .. I've been working on centering my header for DAYS!!! This fixed it!! Thanks a bunch
ReplyDeletewww.aidahphotography.com
My pleasure, Samantha! So happy for you.
ReplyDelete