
 RSS
RSS Email
Email "
"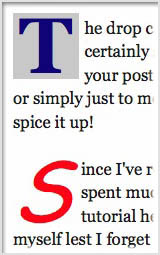 The drop capital letter, sometimes known as 'dropped initial' certainly stands out, right? This is one of the many ways to enliven your posts visually and make them more stylish and eye-catching or simply just to move away occasionally from the mundane display and spice it up!
Since I've recently learned how to create a simple drop cap and spent much time dabbling around it, thought it best to include a tutorial here for anyone who's interested. Also, to keep a record for myself lest I forget the nitty-gritty of it all... something that will surely happen as I age. :-)
It is really easy to add drop caps to all your Blogger posts, using CSS as shown by GreenLava at BlogSentral. It will automatically effect the drop cap on all existing and future posts... so simple and fuss-free!
But what if you would rather not add drop caps to all your posts but prefer to do it selectively, wherever you want on any posts or specific posts and to display different drop cap styles instead of the default one throughout your blog. Well, this can be achieved as easily too!
All you need is to use inline CSS by wrapping the first letter of your post in span tags, styled with CSS (cascading style sheet).
Here's how to easily
create a simple drop cap to your blogger posts:
- Log into your Blogger account to create new post or to edit post that is already published.
- Choose the HTML mode in the Post Editor. Your post must have at least one paragraph to enable a drop cap to be added as illustrated in the image below.

- Replace the first capital letter at the beginning of your paragraph with the following span tag code:
<span style="float: left; font-size: 70px; font-weight: bold; line-height: 50px; margin: 0px 5px 0px 0px; padding: 0px; position: relative;">A</span>
Then, change the capital letter A, highlighted in red, with the capital letter that you want converted to a drop cap. You can customize the CSS font properties, etc. and their values inside the quotation marks for style="" to suit your blog and styling preferences as explained below.
- Preview. You can do this by clicking the button and/or toggle between the Compose mode to view the added drop cap, and HTML mode to modify the CSS code to ensure that it's properly aligned with the adjacent text. Play around with the font-size, line-height and margin to achieve that.
- Save your post when you're finally satisfied. Easy, yes?

(to help you modify the CSS to whatever works best for your blog posts)
- float: left; - the drop cap is floated to the left to allow other text to wrap around it.
- font-family: Georgia, Times, serif; - specifies the font for the drop cap. You can change to the type of font that you like by getting ideas about the various fonts from W3Schools. If this font-family property is omitted in the code, then the drop cap will follow the default font you've set for your blog's posts.
- font size: 70px; - sets the font size to 70px. Change the px value as you wish: the larger the number, the larger the size of font.
- font-weight: bold; - self-explanatory. Omit this if you'd rather the font be normal.
- font-style: italic; - self-explanatory. Omit this if you wish.
- color: red; - defines the font color as red. The color can be specified by color name, rgb value or hex value. More color choices here.
- line-height: 50px; - sets the line height to 50px, change the value as you wish.
- margin: 0px 5px 0px 0px; - sets the four margins around the drop cap, where the first value is for the top margin and followed by right, bottom and left margin respectively.
- padding: 5px; - sets the padding around the letter as 5px. Include this property if the drop cap has a background color, with the value changed as you wish.
- background-color: lightgrey; - self-explanatory. Exclude this property if you don't want it.
- text-shadow: 2px 2px 2px #9966ff; - sets a shadow for the drop cap where the first value is for the shadow's horizontal length, the second is for its vertical height and the third defines the blur distance, plus an optional color. If no color value is indicated, a shadow is created using the color of the font.
- position: relative; - specifies the type of positioning.
to guide you further about the variables you can apply to create your own styles.
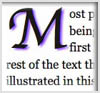
<span style="float: left; font-family: 'Apple Chancery',cursive; font-size: 70px; line-height: 50px; margin: 5px 5px 0px 0px; position: relative; text-shadow: 2px 2px 2px rgb(153, 102, 255);">M</span>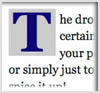
<span style="background-color: lightgrey; color: darkblue; float: left; font-family: Georgia,Times,serif; font-size: 65px; line-height: 45px; margin: 0px 5px 0px 0px; padding: 5px; position: relative;">T</span>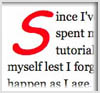
<span style="color: red; float: left; font-family: 'Comic Sans MS',cursive,sans-serif; font-size: 70px; font-style: italic; line-height: 50px; margin: 2px 8px 0px 0px; position: relative;">S</span>Go on... try it out... be creative and have fun!
If you enjoy learning and love to know more about CSS, do explore the comprehensive lessons and training available at W3Schools.
This superb online school that provides free HTML, XHTML, CSS, JavaScript, XML, ASP, PHP, SQL tutorials with lots of working examples and source code, has helped (still does) and enriched me so much in my pursuit for knowledge and enabled me to share what I've learned here.
Update: Oct 21 2011
I was made aware that certain cursive fonts are not supported by the IE browser. You may want to explore the Code Style site to learn about the common fonts for CSS font-family properties.
 "Keep learning~~keep smiling~~keep sharing"

Hi Jacqueline
ReplyDeleteI quite like this idea, maybe will try out ....not on all posts, once in a while, to brighten up the post.
Thanks for sharing!
You're most welcome, my dear... I enjoy sharing what I've learned. Do try out, it's fun really and the result will surely delight you!
ReplyDeleteI just put up a post using this drop caps ....... so pleased with it. Take a look ..
ReplyDeletehttp://cheah2009.blogspot.com/2011/10/baklava.html
Yay... thumbs up for you, Cheah! :)
ReplyDeletethanks for the heads up on this Jacqs :-) I am assuming that we need to code each post individually and this alteration cannot be applied on all previous psots blogged in one shot right?
ReplyDeleteAlso, need some help urgently on :
a) how to create blog post summaries with a thumbnail on the main page of my blog?
b) Unable to add 'subscribe thro email" powered by feedburner. I must have tried at least 15 - 20 times, and each time get a message "cross scripting prevents this code from being added" :( Pls help !
thx a ton
Kalyani
Kalyani, please follow the link to GreenLava at BlogSentral that I've included above if you wish to effect the drop caps automatically on all existing and future posts.
ReplyDeleteYour request #a) is unclear. Is it to add a button or image to replace the 'Read More' text? Anyway, check out my tutorial at http://jacqsbloggertips.blogspot.com/2011/01/customize-and-style-read-more-link-in.html.
Re request #b), check another tutorial at http://jacqsbloggertips.blogspot.com/2011/08/add-bloggers-follow-by-email-gadget-to.html.
Hey Jacq --
ReplyDeleteMany thanks for this. I've wondered a long time how to do this, and how much work I'd have to do to do this. Your tips made it easy & fun. Classed up my blog's look, too, big time. Great job!
You're most welcome, Michael. Great to know you're happy with your success.
DeleteStumbled upon this post. Quite helpful! Thanks!
ReplyDeleteMy pleasure really in sharing, WildWSS, Thanks for your appreciation.
Deletewow, it's amazing.. I will try it in my blog . thanks Jacqueline
ReplyDeleteYou're most welcome, Yoyo Suharyo! All the best to you.
DeleteI really liked your post because I can learn a lot of things to your blog.
ReplyDeleteThanks for your appreciation, crystal x.
Delete