
 RSS
RSS Email
Email "
"It's a tiny image (16x16px) that you can have next to your web browser's window or tab to give the professional touch to your blog and make it easily identifiable.

Thanks to the Blogger team that had enabled this feature more than a year ago and simplify the process for us bloggers to install it at our blogspot. Yay... no knowledge of HTML or CSS codes required! Isn't that wonderful?
For those who are interested and yet to apply your uniquely customized favicon to your blog, just follow the steps in the tutorial below.
Here's how to easily
add your custom favicon to your blogger blog:
(using Blogger's new user interface)
- Firstly, you have to create your favicon image, using Photoshop software (or other photo editing software), or copy an image from webs offering free images. Then save it as JPEG or PNG file in your hard disk drive, ready to be used later. Preferably, it should be a square image that's less than 100KB. Though Blogger can resize a larger image to the correct dimensions, it is best that you yourself create or resize your image within the specified dimension to ascertain its clarity and crispness.
- Next, log in to your Blogger account. At Dashboard, click on the related Blog's Name that you'll be working on.

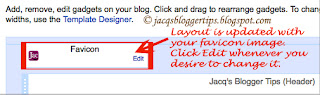
- When a page opens, choose the Layout tab on the left menu and click on it to proceed. Then click the Edit link to replace the default Blogger's icon to your own custom favicon.

- Next, the Configure Favicon window appears. Click the Browse button to choose your custom favicon that you've saved on your hard disk drive.

- The minute you upload your custom favicon file from your disk drive, your selected favourite icon will appear in the Configure Favicon window as shown in the screen shot below. If you're pleased with the result, just click Save to close the window.

- Your Blog's Layout will then be updated with your favicon image. (Note that you can change the icon whenever you desire by clicking Edit and follow the tutorial all over again).


Why don't you experiment it? Come on, let your creativity and imagination run wild. :-)
Rather easy, right! Hope this sharing had helped and made you happy.
Enjoy!
 "Keep learning ~~ keep smiling ~~ keep sharing"

Thanks for The Tutorial....
ReplyDeleteYou're most welcome, Souvik. I enjoy sharing my knowledge.
DeleteHi, Good day to you my great mentor in blogsphere. Thank you very much for your wonderful tutorial in blogging. I always apply your teachings here in my blog from Day One since i created my website... I remember the first time when i was browsing for any blogging tips in the internet and surprisingly found precious jewels in your amazing lessons i am carrying till now.
ReplyDeleteThank you very much teacher. God bless and may you have a blessed and long healthy good life! May your passion to teach us in blogging continue to touch lives...
God bless and more power!!!
Ooh Irene... such precious and generous expressions are music to my ears!
DeleteThank you so very much for your confidence in my blogging tips. Knowing that many bloggers like you have benefited from my labour of love and are happy with the results, keeps me joyful and contented in return. That's my reward... in giving I received - a wonderful chain reaction of charity and love!
I've much to learn too and thank goodness, there's the world wide web to teach us where people share their knowledge and talents generously. Bless them.
Thanks too for your kind blessings and encouragement. I appreciate you taking time to pen them here.
All the very best for 2013 to you and your loved ones. God bless.
Thanks for this. I also found your post about how to remove a follower from your blog really helpful.
ReplyDeleteMy pleasure in sharing, Charles! Nice to know and thank you.
DeleteThis is awesome! Your tutorials are so well written and easy to follow. Many tks. Monique
ReplyDeleteYou're most welcome, Monique! Thank you for the thumbs-up.... much appreciated!
DeleteThank you, Jacqueline! This was very easy to follow. Love my new favicon!
ReplyDeleteYou're most welcome, April. Sorry for late response due to my health condition. Happy blogging.
DeleteLovely Post How to Add Custom Favicon in your Blogger Blog
ReplyDelete