
 RSS
RSS Email
Email "
"However, if you are still using the old Classic Template, you'll first need to upgrade your blog to Blogger New Layouts feature to enable you to add gadgets to your blog. To upgrade, just click on Template, Customize Design and then Upgrade as detailed at Blogger Help.
How to add gadgets to your blog, edit and reposition them :
(an easy tutorial for new bloggers or those who've recently upgraded to New Layouts feature)
- Sign in to your Blogger account which will then lead you to the Dashboard.
- Click on Layout and the Page Elements layout opens for you to add, arrange or rearrange the page elements (gadgets) on your blog. The blog page is basically made up of four sections: header at the top, main column where the blog posts are, sidebar(s) (one, two or more, depending on your template design) and the footer at the bottom.

Click the Add a Gadget link at any section of the Layout that you want your gadget to be displayed. You can add as many gadgets as you wish, one at a time. As in picture above (taken from the default Blogger Minima template), the Add a Gadget link appears at 3 sections, that is, below the header, at the sidebar and footer.
If you want gadgets above and below the blog posts (main column), it can be done too - just select the Add a Gadget link at any of the 3 sections, follow the steps (as in steps #4-5) to add the gadget of your choice. Then, click and drag the page element to reposition it where desired as illustrated in images below.


- Clicking the Add a Gadget link will open the Add a Gadget window that will display the various gadgets available under Basics. Just scroll down to find the gadget you want and then click the plus sign beside it (or its thumbnail or gadget name) to select your choice. Or browse through the other gadget galleries for more by clicking any of the links listed to the left of window.

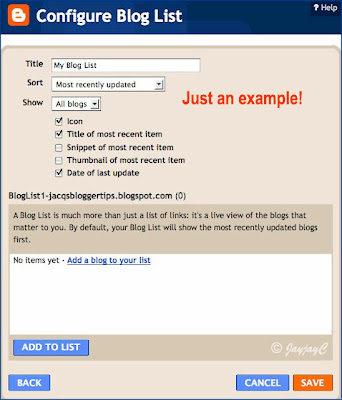
- A window of your selected gadget pops up for you to configure the gadget. The Configure Blog List as illustrated below is one such window. Just follow the steps/options, enter the relevant data and click Save when done.
- By default, Blogger puts the newly-added page element (gadget) at the top of the section you've selected. But, you can rearrange or reposition your page elements anywhere to your liking. Just click on the page element that you want moved, hold down the click to drag it to new position and release click to drop it there. Take note however that all page elements can be moved except your navbar, header and blog posts.
Finally, click Save, followed by the View Blog button to see the changes or additions.

- Should you want to edit any page element (including the Navbar, Header and Blog Posts) or gadgets that have been added, just click on the Edit link of the gadget and its window pops up to enable you to make changes. Click Save when you're done. Read more on Layout Guide by Blogger Help.


nice tutorial. easy to learn...
ReplyDeleteThanks for your lovely feedback, Gagan Masoun!
DeleteHave a nice day.
Good points explained. It will definitely help in giving a new look to blog www.auraofthoughts.blogspot.com
ReplyDelete