
 RSS
RSS Email
Email "
"Hence, I'm happy to share here some related tips for those seeking to learn how to customize and style the 'Read More' or Jump link in various ways as illustrated in the image below!

To do that, you'd first need to have the 'Read More' link below your post summaries in your blogspot posts. If you don't know how, follow this tutorial to create 'Read More' with Blogger's jump break feature.
Next,
learn how-to customize and style the 'Read More' or 'Jump Link'
in these interesting ways -
A. Change the 'Read More »' default text :
- Sign into your Blogger account. At Dashboard, selecting Design will bring you to the Page Elements page. Click the Edit button of the Blog Posts gadget.
- The pop-up Configure Blog Posts appears to enable you to change the text to whatever you fancy.
- Click Save to exit and effect changes.
(by default, it's left-aligned)
- Just need to add CSS (cascading style sheets) to your blog's template. Go to Design | Template Designer.
- Click Advanced | Add CSS tab. Add the following CSS code in the field box provided and click Apply To Blog when done:
.jump-link {text-align: right;}
(change the word, right to center if you want to center-align the text)
- As in B. above, go to Design | Template Designer and add the following CSS code at the field located in the Advanced | Add CSS tab:
.jump-link {font-size: 110%; font-family: "lucida handwriting", cursive;}
(change the font size and family as desired)
(this will override the default style)
- Add CSS to the Template Designer as follows:
.jump-link a {background: #b2b4b6; color: #ff0000; padding: 2px;}
(I've chosen a grey background and red text but you can change the colours to match your blog and increase the px value if desired)
(colours of the background and text changes when a reader mouseover the 'Read More' link)
- Add CSS to the Template Designer as follows:
.jump-link a:hover {background: #000000; color: #ffffff; padding: 2px;}
(this example has a black background and white text, you can change the colours and padding size as desired)

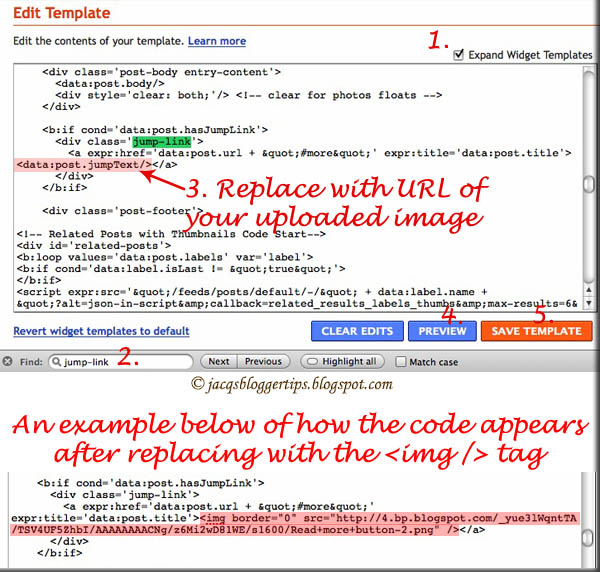
F. Add a 'Read More' linked image or button as an alternative to the plain text link :
- Go to your blog's Dashboard | Design | Edit HTML. Before editing, download a copy of your template.
- Tick the Expand Widget Templates. Then, use the browser's search feature (Ctrl+F in Windows or Command+F in Mac) to find the word, jump-link and locate in the next line, the following code:
<data:post.jumpText/>
- Replace the above code with the image tags as follows:
<img border="0" src="URL OF THE IMAGE" />
(where the URL OF THE IMAGE is the entire URL of your uploaded button image as stored by your photo hosting website, such as Blogger, Photobucket or Flickr)
- When done, click Preview to see the changes and if satisfied, click Save Template and View Blog.
- If you'd like to right-align the button, simply follow steps at section B above.
Other related links:
Enjoy styling the appearance of your 'Read More »' links!
Keep learning~~keep smiling~~keep sharing!!


Perfect....
ReplyDeleteGreat...100% or i want to say 200%
keep it up
Regards,
Manish
http://manishagarwalhyd.blogspot.com/
Thanks for the thumbs up, Manish!
ReplyDeleteHi Jacqueline.
ReplyDeleteToday I link to your blog to inform my blog readers and friends about your wonderful, informative blot tutorials. My post is here:
http://www.mynicegarden.com/2011/01/jan-2011-gbbd-and-foliage-follow-up-my.html
Thank you for all the hard work and keep up the good job. Cheers!
That's sweet of you, A. Belle! Thanks a lot! Will hop over shortly.
ReplyDeleteAs always, very very informative.
ReplyDeleteOne request: Can you remove the word verification, it will allow commenting easily.
Secondly, I have a question, a little out of context but may be you know a solution.
When I follow blogs, my photo does not show up in the followers list. It however does in my profile as well as comments I give on other's post.I found some solutions to change it through the Blogs I am following> Manage>Setting, but when I click on the settings button corresponding to any of the blogs I follow it takes me to Google friend connect page and I am asked to log in again. When I do it using my google account, it gets me back to the same place and the loop never ends.
Any suggestions?
Thank you.
Thanks for your kind comment, Avinash Chandra!
ReplyDeleteSorry, first request rejected as word verification is an additional tool that's necessary to reduce spammers.
Re your question about photo not showing in followers list, I'm really clueless on this matter. Probably you may want to redirect it to Blogger Help @ http://www.google.com/support/blogger/ where others may be able to help solve your problem.
Dear Jacqueline,
ReplyDeleteFirst of all sorry, I was away traveling for some time and hence could not reply before.
I understand your point of sticking to word verification.
Regarding my problem, I have solved it.
Thanks for the kind gesture.
Thanks for responding, Avinash. No need to apologize as it's understandable that everyone has his/her own priorities and life to live. I'm glad that your problem is over.
ReplyDeleteHello! I am a new follower, and new blogger that has found your site to be so very helpful to me! I posted about your site today on my blog, which is normally about sewing lol.. http://sew-chic-designs.blogspot.com/2011/02/archives-page-and-blog-tips.html . Being a new blogger it is hard to understand how some of these little(and not so little) changes are made that make a huge difference in how your blog looks, and I can't thank you enough! Have a great day and I will be reading!!
ReplyDeleteWelcome and thanks for following, Loree! I'm delighted that you've found my tutorials helpful and really appreciate you taking the trouble to pen your positive thoughts and linking to my site...thanks so much!!
ReplyDeleteCheers and have a wonderful day!
Nice article. This is a helpful post. Thanks for sharing your thoughts. Looking forward for more tutorials in Blogger.
ReplyDeleteThanks,
ReplyDeleteI couldn't move it to right side, if i didn't read this post.
- Sankar Datti
Outsource SEO: Thanks for feedback and appreciation.
ReplyDeleteSankar Datti: Great to know your wish fulfilled. Thanks for feedback.
Done this now :) thanks a lot Jacqs ! Glad to follow you....
ReplyDeleteThat's great, Mom Chef. You're most welcome and thanks for following.
ReplyDeleteThank you so much :)
ReplyDeleteMy pleasure, Anonymous!
ReplyDeleteThank you very much.. very useful to me..
ReplyDeleteGreat to know it had been useful. Thanks for your feedback.
ReplyDeleteThanks Great Work Good You are Good Person Visit my Site Tricks and Tips for Computer www.ashiq-hassan.blogspot.com
ReplyDeleteThanks for your kind comment, Ashiq!
ReplyDeleteI enjoyed reading this informative post of yours. I was impressed and I like it. I am looking forward in your next post. Keep sharing.
ReplyDeleteShasing
Thanks for the encouragement and kind comment, Shasing. Look forward to seeing you. Will definitely keep sharing my knowledge whenever I can. :)
ReplyDeleteIt's cool that you're able to style those "read more" links easily with CSS. But there's something about those that made me think about my site's bounce rate. Wouldn't clicking a "read more" link from the main page count as a bounce from your domain?
ReplyDelete-- Man Ray
Thanks, Man Ray! I don't think that clicking the 'read more' link is considered a bounce as the reader is directed to the post page which will be counted as a second page visited within my site.
ReplyDeleteYour post was simply incredible and I really like it. I enjoyed reading it. You did a good job. Thank you for sharing.
ReplyDeleteShasing
Thanks for the thumbs-up, Shasing. Much appreciated.
ReplyDeletehi bro i m max what were i do i not put readmore butten in my blog post r labeled but read more butten not coming
ReplyDeletecheck it out
www.mjartss.blogspot.com
so plz help me
Max, could you please reword your request because it's incomprehensible. Anyway, I noticed that you already have 'Read More' in your blog posts.
ReplyDeleteThank you so much!!! I messed around for hours trying to get this coded right. It only took me one try with your help.
ReplyDeleteYou're most welcome, Angela and thank you for the positive feed back.
ReplyDeleteVery useful CSS utilization with the "read more". One way of improving your writing skills i think. Thanks a lot for this.
ReplyDeleteThanks for your positive thoughts.
DeleteThank you for this!!
ReplyDeleteYou're most welcome, Cadence!
DeleteI LOVE THIS AND THANK YOU SO MUCH!!
ReplyDeletesaved my blog. <3 <3 <3 keep up the good work!
Happy to know you're delighted with the result, Fena! Thanks for your appreciation and encouragement.
DeleteThank you for sharing a lots of useful tips :). Can you make a tutorial about changing the opacity of background ? I really frustrated about it, Thank you :)
ReplyDeleteBlushOff [Beauty Blog]
You're most welcome, Marsha... I love sharing my knowledge! About changing your background, if you're using the Blogger Templates, just choose 'Template' at your dashboard, then click 'Customize' that appears below 'Live on Blog' and scroll to 'Advanced' and follow through the various sub-menu on background to achieve your desires.
DeleteHope this helps!
hi, I have been trying to make some changes to my read more button and have followed your instructions but it made no difference? I just wanted to align it to the right and make it bigger but when I added the code you gave nothing changed? Help!! I am pretty rubbish with coding though so maybe I am missing something? Charlotte xx
ReplyDeleteThanks for dropping by, Carlottas. I'm truly sorry that I'm unable to help you 'cos I don't troubleshoot technical problems. Whatever I've tried out successfully are in my article above. Probably you may want to redirect it to Blogger Help @ http://www.google.com/support/blogger/ where others may be able to help solve your problem.
DeleteJacqueline, thank you from the bottom of my heart. With your help, I'm beginning to spice up my blog the way I have wanted to for a long time :)
ReplyDeleteYou're most welcome, Angela... I love sharing and if it had put a smile on your face, that's my reward. ;)
DeleteHappy bloggging!
Thanks! Worked perfectly.
ReplyDeleteMy pleasure in sharing, GM. Delighted to know you've succeeded! :)
DeleteThank You so much for this! I tried many for hours, and failed. Yours are so simple and work like magic. Now I can stop pulling my hair and go to sleep =D
ReplyDelete♥xx♥
You're most welcome, Cynthia. Thanks for the compliment and I'm happy to know the tutorial had helped you. :)
DeleteThank you, just used this and added my own text and image. Much appreciated
ReplyDeleteYou're most welcome, FitznBitz!
DeleteThanks a whole lot. Used this knowledge to make changes to my blog. Keep up the great job.
ReplyDeleteMy pleasure in sharing, William! Great to know and thanks for the encouragement.
DeleteHappy blogging!
LOVE IT! thank u sooo much.. the CSS function in advance option works just find! so much simple than html... thank u!
ReplyDeleteYou're most welcome, Fernanda! Delighted to know you're so happy with the results. Thanks for putting a smile on my face with your exuberance. :)
DeleteThank you so much for this!!! Question though, how do I add a space between the view this post and the part of the post that was before the "view this post" link???here's my blog link: http://sarahgolez.blogspot.com/
ReplyDeleteYou're very welcome, Sarah. To add your required space, edit your post just before the 'Jump break', press the 'RETURN' or 'ENTER' key on your keyboard a few times to effect the line breaks/space as desired.
DeleteHope this helps.
Thank you so much for the codes - really helped me a lot as I build my blog! Great work :)
ReplyDeleteYou're most welcome Yi Wei Lim! Great to hear. :)
Deletethank you so much! one question, when I added it, it also changed the font of the "linked within...you might also like..." that is right beneath it. How can I fix that please?
ReplyDeleteI would also like to remove my custom signature if you happen to know how to do that as well :)
Sorry, Lucy Designs... I'm unable to help you 'cos I don't troubleshoot technical problems. Whatever I've tried out successfully are in my article above. I don't understand why your font for the phrase 'You might also like:' changed since both the Read More link and You might.... are entirely different widgets.
DeleteThanks for sharing, very helpful indeed! I surely made my blog prettier.
ReplyDeletewww.audreysglams.blogspot.com
You're most welcome, Katia Audrey... glad you've found it helpful. ;)
DeleteUsually I never comment but the results were so compelling I just wanted to give you a big THANK YOU. Really made my day.
ReplyDeleteThank you kindly, Chef Chow! It's my pleasure sharing my knowledge. ;)
DeleteThank you very, very much! Such clear instructions :-).
ReplyDeleteYou're most welcome, Heidi Kay. Have a nice day.
DeleteThank you! I know this is an older post, but I was needing to change the size of "Read more" and couldn't figure it out. Thank you so much!
ReplyDeleteGreat to know that it help you, Sydney Logan.
DeleteHappy blogging. :)
This is another thing you've really helped me with! I just had to mention your blog in one of my blog posts, hope thats okay!
ReplyDeletehttp://realisebeauty.blogspot.co.uk/2014/07/html-headache.html
Hi Katie. That's sweet of you... I really appreciate what you've done. God bless.
Deletethis is very helpful, thank you!
ReplyDeleteCassie
Great to know, cassie cadiz. Much thanks for voicing your opinion. Happy blogging.
DeleteThis is the most amazing, most helpful post so thank you very much for sharing! I have tried all day adding HTML without luck and your method is simple and effective!
ReplyDeletehttp://www.sabelista.com/
HI, I cannot change this at all, I'll appreciate if anyone can help me, please please. I have a feeling it has something to do with the template I'm using. I did the search for that text, nothing comes out I changed the text to be read for what I want on layout-popt and nothing, it still displays, continue reading. I don't want anything fancy, all I want is for that to be in spanish as my blog is in spanish, and beleive it or not most people win't understand they have to click there to read more. I really didm't want to change the template again since I work so hard to get it to how it is now. Can someone please help me somehow please. Thanks
ReplyDeleteSame here :(
Delete