
 RSS
RSS Email
Email "
"Please ignore my tutorial below since it is no longer
applicable as Abu Farhan's script is now not workable.
Moreover, Google has issued a malware warning
on Abu Farhan's site as follows:
'This site may harm your computer'.
Hooray! I've finally created an Archives Page and am so exhilarated with the result, especially a long-awaited one for my Blogger blogs! Some may name it Table of Contents, Index or Sitemap Page instead. Have a peek and you too may fall for one, yes? Confident that some bloggers would, I simply couldn't resist sharing this goody here. :-)
Went on a treasure hunt a couple of days ago for a Table of Contents or Sitemap widget for Blogger and after exploring for hours through various potential sites and experimented them unsuccessfully, I finally came across some awesome widgets (scripts) created by Abu Farhan that worked like a charm and were instant successes!
Just inserting his script

An Archives Page like this with the complete contents presented together in a single page will definitely make our blog posts easily accessible and navigable, providing more options not only to readers and search engines alike, but also as a reference to blog owners ourselves, to recall whatever were published and enable easy addition of internal links to new posts, when needed.
Here's how to create a Table of Contents in an Archives Page, sorted by dates :
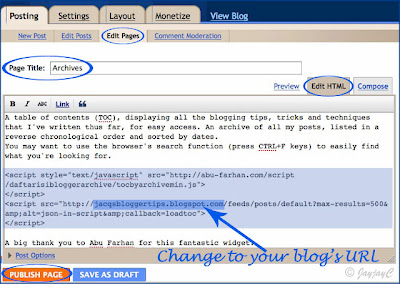
- Create a Page first - go to Dashboard | Edit Posts, which will then open the Posting tab in Blogger. Select Edit Pages, click on the New Page button and type in the Page title, e.g Archives, Table of Contents or Sitemap, or whatever that you fancy. Ideally, the title should be short as that will also serve as the page tab's name in your blog.
- Next, select the Edit HTML mode to prepare your post. Copy and paste the following code into the post box :
<script style="text/javascript" src="http://abu-farhan.com/script/daftarisibloggerarchive/tocbyarchivemin.js">

</script>

<script src="http://jacqsbloggertips.blogspot.com/feeds/posts/default?max-results=500&alt=json-in-script&callback=loadtoc">

</script>
Then, change the code in red (jacqsbloggertips.blogspot.com) to the URL of your Blogger blog.
- You can add extra content, such as an introductory/explanatory paragraph above or below the script code, if you wish. Do this while in the Edit HTML mode. Then click Publish Page and you're done. Once your Archives Page is published, its tab will appear under your blog's header.
(Tip: the Page tabs are linked to the Pages widget (gadget) at Layouts | Page Elements where you can configure the page list).

For those with Wordpress-powered website, you can learn to install the WP-Archives plugin to create an Archives Page...refer to my tutorial at jaycjayc.com, if you're interested.


i'm not able to view the code for table of contents
ReplyDeleteWhat do you mean, d? The code is clearly visible at step 2 of the tutorial!
ReplyDeleteOr do you mean that the code is not visible at the post editor after you've copied and pasted? Please remember that you have to select the Edit HTML mode to paste the code in, and not while in the Compost mode. Even after pasting, you can view the code only in Edit HTML mode but will not be visible in the Compost mode.
Hope this explanation helps.
tis is d only...yesterday i couldnt view the code in step 2.... i dont know y...but now it is visible...
ReplyDeletethank u very much...i have converted labels into drop down menu by ur help...thank u very much...
d code doesnt work in my blog..wt could i do?
ReplyDeleteDid the Archive Page and its tab appear in your blog after you've published it? If yes, but showed an empty page except for the page title, then I can simply assume that you erred either in copying/pasting the code or changing the URL to your blog's URL. When changing to your blog's URL, see that you do not repeat again: http:// which has already been included before it, in the script code.
ReplyDeleteTry to do it once again, hopefully it works otherwise I'm unable to help further as I've tried it at 2 other blogs of mine and it worked fine.
Hi
ReplyDeleteI've successfully 'installed' the Archives page in my blog header. Thanks so much for sharing!
My pleasure, dear friend! Great to know that you didn't face any problem...at least it confirmed that my bag of tricks does work like a charm, right? Hehe!!
ReplyDeleteHey, i'm used the older way of putting the contact me, toc to my header etc(ie by posting it and then copy the link and put it to the title I've put in the header), the only way before blogger introduce the static page element
ReplyDeleteHowever, I dont see how this trick is not working although I just to copy and paste the html to my post.
any ideas
Hi Affan,
ReplyDeleteProbably, it did not work because you copied and pasted the code, in the Compost mode. You have to choose the Edit HTML mode of the post editor to do it right.
I just tried out at my test blog as a post, not a static page and it worked fine.
Hey!
ReplyDeleteThanks for sharing. Your a genious!
It worked so fine. But how do i move the blog-archieve from the sidebar then?
You're most welcome, Kong Carlo!
ReplyDeleteI'm assuming that you'd like to remove the blog archive from the sidebar, right? If so, just go to Layout > Page Elements, then choose to edit the Blog Archive gadget and click on the Remove tab when the Configure box pops up. That's it!
Thank you a lot!
ReplyDeleteI was looking for this!
My pleasure, jmvicuna!
ReplyDeletePerfect! thanks for posting this tip.
ReplyDeleteThanks for your appreciation, Padraig! I enjoy sharing my knowledge! :)
ReplyDeletethanks a lot... realy good but do not understand need of abufarhan.com line in code
ReplyDeleteYou're welcome, Mahesh! The link to Abu Farhan site comes intact with the code. Anyway, to me, it's almost inconspicuous and that's the least we can do to show our appreciation for the awesome widget which the author has generously spend much time in creating and sharing. Moreover, the link will benefit many others who are attracted to the archives display and may want it installed at their blog. Thus, clicking on it will lead them to its source.
ReplyDeleteThanks for the help! I love it!!!!
ReplyDeletethanks a lot! it couldn't have been easier
ReplyDeleteAndrew & Alimentacion :
ReplyDeleteThanks for your appreciation. Delighted to receive your feedback! :-)
Hi, thanks so much. Your tutorials have helped alot, much appreciated. You're definitely a source for reference.
ReplyDeleteMy pleasure, Chelley! Thanks for making my day with your kind assurance. :)
ReplyDeletethis works for me! thanks
ReplyDeletehttp://pcmediks.blogspot.com
Great to know that it worked well for you, Patola!
ReplyDeleteThis was certainly helpful! I used it on my blog and it was a success. Thank you very much for sharing.
ReplyDeleteManila Girl
Delighted to get your positive feedback, Manila Girl. :)
ReplyDeleteExactly what I was looking for. Thanks.
ReplyDeleteMy pleasure, keineisteinek!
ReplyDeleteThanks! It works!
ReplyDeleteThanks for your appreciation and feedback, infinitymusics!
ReplyDeleteI searched forever and finally found this to be the most clear and easy way to do this!
ReplyDeleteThanks!
(I hope you don't mind, but I provided the link to this post on a Google Q&A board)
You're most welcome, BYU Rugby Forever! Much thanks for taking the trouble to pen your appreciation and linking to this post that others may benefit too!
ReplyDeleteHi, Jacqueline, thank you very much for this info. I am so happy I have an archive in my blog now. If you don't mind, I'll inform others in a post soon and link back to your tutorial. Cheers!
ReplyDeleteThe pleasure is all mine, A. Belle! Delighted you've successfully created one for yourself and by all means, do go ahead and share the good news...I really appreciate your thoughtful gesture in wanting to link back here. Thanks and cheers!
ReplyDeleteI got this to all work and have deleted the widget from main page. But I can't click on the archived dates now that they are listed on a separate page. I can only select the month. And no post titles are listed?
ReplyDeleteThankyou
This was an amazing help. Worked great! Thanks!
ReplyDeleteMy pleasure, Venassa! Thanks for the feedback!
ReplyDelete@ The Oddity
ReplyDeleteHi,
Your Archives Page looks okay with post titles included, so your problem is already solved, right?
Of course, the display at your Archives Page and the Blog Archive widget that you've deleted are different, each has its own format and merit. If you're more familiar with operating the normal Blog Archive widget, why not add back the gadget to your sidebar again.
Even though I have an Archives Page, I've also installed the Archive widget at my sidebar because I find that it can provide an overview of my blog's existence with the display of monthly archived dates. Also, for the usability of some readers who are accustomed to the default archive widget.
I've been trying to figure this out for days and found your post today and it only took a minute to get it working! Thank you!!!
ReplyDeleteYou're most welcome, kenziekylanmom! Great to know you're delighted with the outcome!
ReplyDeleteRealized that you won't see the posts/archive if you set your blog's permission to private.
ReplyDeleteit works for me when i set it to public.
Hi Jacquie, It worked like charm, thanks to you and, of course, Abu Farhan. I always felt handicapped without a widget like this. Not anymore. Thanks again.
ReplyDeleteP S:It was only through your blog that I learnt about Blogger's sticky Page - TY
My pleasure, KJ Shenoy! Delighted that you're pleased!
ReplyDeleteSticky page? That's a new term for me. Haha...I had to google to find out what that meant. Thanks for the prompt though!
Hi,
ReplyDeleteI implemented this hack but it is displaying the post sorted by label. So if a post has more than one label it is in several places. I just want it to display the post in date order. Maybe having labels displayed on side but not necessary.
Here is my blog Petwithallergies.blogspot.com
You can access the toc from the toc button at the top of the blog.
Any suggestions?
Thanks
Stacey
I think you're a little confused, Stacey! If you had implemented the hack following this tutorial, the display of all your posts will be sorted by dates as you'd desire. Just follow this tutorial for Archives Page and your problem will be solved.
ReplyDeleteIt appears that you've instead applied my other tutorial for sitemap which generates the list of posts by labels.
Yes, you are correct I saw both of your posts and pasted the sitemap code instead of the table of contents code. corrected and working perfectly. Thanks for a great blogger resource.
ReplyDeleteHave another question off topic. There used to be a script to edit comments but it stopped working once the new blogger came out. Any new scripts to be able to edit comments?
Thanks again,
Stacey
Natural Remedies for dogs | Natural Remedies for Cats
You're most welcome, Stacey. Great that all's well now.
ReplyDeleteSorry that I've no clue whatever about editing comments in Blogger, though I do find it strange that this useful feature available in WordPress is non-existent here!
Thanks a lot Jacqueline, also for Abu.. you are great !!
ReplyDeleteAfter long searching and try a failed script... I've got this one !!
Luv you sooo much !!! lol :D
You're most welcome, Yonmen-club! Thanks for your appreciation. Delighted that you're pleased. My pleasure really sharing my knowledge.
ReplyDeleteEXACTLY what I was looking for, thank you!
ReplyDeleteGreat to know that the tutorial was helpful! Thanks for taking the trouble to comment, Juliana!
ReplyDeleteThank you SOOOOO much! I knew there had to be a quick & easy way to do this!!! :)
ReplyDeleteThanks for your appreciation and feedback, Lisa Brown!
ReplyDeleteTHANK YOU, THANK YOU, THANK YOU!! Have spent 3 hours trying to find out how to do this- your post was so easy, I got the result I wanted in 2 mins flat.
ReplyDeleteMichelle
Michelle's Style File
Lovely to know you're happy with the result, Michelle. Appreciate you taking the trouble to share your kind thoughts.
ReplyDeleteThanks so much for posting this. It worked great and was so easy. I am also wanting to get my blog roll on a separate page. Have you ever run across a way to do that?
ReplyDeleteYou're welcome, Amanda! I get great pleasure in sharing. Haven't thought of a page for my blog roll as yet since it isn't that long. I've seen one long ago in some foodie blog but never attempted to pursue how to do that...maybe one day, I hope?
ReplyDeleteBTW, thanks for following...appreciate your interest!
This is awesome! I've been looking for this for ages since I started my blog.
ReplyDeleteWorks fine but how do I customize to show only specific tagged posts?
Thank you so much! This was exactly what I was looking for - and you made it so simple!
ReplyDeleteI do have a question is there any way to do something similar but just show todays post only?
Thanks, Elaine! This hack has been authored by Abu Farhan...you may want to pose your question to him at http://www.abu-farhan.com/2009/09/table-of-contents-categorized-by-dates-by-archived/
ReplyDeleteAnyway, he has another script for a sitemap page that will display all posts sorted by labels (tags) and I've done a tutorial about it @ http://jacqsbloggertips.blogspot.com/2010/05/create-table-of-contents-or-sitemap-for.html Check it out just in case this suits you.
@ Coupon Housewife
ReplyDeleteYou're welcome...delighted you're happy! Sorry though, I'm unable to offer any further help re your question.
hi Jacqs :
ReplyDeleteA great tool again ! :-) must say ur blog is a a haven for newbie bloggers like me ! Thanks a ton :)
I however, didnt have too much success creating a table on the main "home page" of my blog. For instance, mine is a food blog, so I would like to create a menu-based drop down list and sub lists (for eg: Dry gravy->North Indian, Dry Gravy-> South Indian, dry gravy->Continental) .. hope u do get the drift ! please mail me the "how-tos" on this please..
Thanks for your kind words, Mom Chef!
ReplyDeleteSorry, I can't help with your own particular request due to my limited technical knowledge and time constraint.
thanks so much for the tutorial! you are a gem! been googling for ages trying out find out how to create my archive page.
ReplyDeleteGreat to know that you're happy with the result, Shuhada! Thanks for positive feedback.
ReplyDeleteAwesome! Perfect fix! Thank you for sharing! ;)
ReplyDeleteYou're most welcome! Thanks for thumbs-up.
ReplyDeleteThanks! Very easy to follow! Can't wait to see what you post in the future! Hope it's okay with you that I added you to my Resources page.
ReplyDeletehttp://lilbilbits.blogspot.com/p/resources.html
My pleasure in sharing, lilbil! It's sweet of you to link me to your Resource page. Thanks, I appreciate that.
ReplyDeleteBtw, just to inform you that the link to my blog placed at your Resource page is not working. Probably you'd want to check that out.
Thank You!!!
ReplyDeleteYou're most welcome, Yong! Thank you for your thanks.
ReplyDeleteThank you - this was very helpful.
ReplyDeleteMy pleasure, Tara! Thanks for taking the effort to show your appreciation.
ReplyDeletethank you so much!
ReplyDeleteThanks. Very easy and helpful.
ReplyDeletehttp://shabareesanchay.blogspot.com/p/blog-page_27.html
Thank you for your appreciation, Effe and Shabareesanchay!
ReplyDeleteThanks so much. Was trying to do this on my own, and failing. So easy.
ReplyDeleteDelighted to know you've found the tutorial helpful. Thanks for feedback.
ReplyDeleteThis is exactly what I was looking for! Your instructions were easy to follow, and spot on, thank you so much for sharing.
ReplyDeleteMy pleasure, Rachel C. Thanks for making my day with your sweet and positive comments.
ReplyDeleteI tried to change the maximum posts from 500 to 900 because it won't show all my posts. Appearantly it's not possible to increase the max. posts? Thanks.
ReplyDeletethank you soooo much for sharing! I've been looking this up and only found such complicated ways! This was so easy!
ReplyDeletethanks again!
Yaaaah! Thank you Jacqueline! This was an awesome tutorial!!
ReplyDeleteCheck out my new archives page on:
http://mybeautifulbrooke.blogspot.com/
I've linked to your page there with your button!! I can't wait to browse through more of your stuff!
~Brooke
@ Tom - You're welcome. Please post your enquiry on how to increase posts above 500 to Abu Farhan, the author of this hack... link already included in my article above.
ReplyDelete@ The Crow Family - Thanks for your lovely feedback and appreciation. It's makes sharing so much fun! :)
@ Tayskye - Thank you so much for your thanks and compliments. Brooke, I truly appreciate your mention about my blog and button inclusion at your page. Feel free to explore this site and hope you'll discover more helpful tips ahead. God bless! :)
Thank you for saving me hours of time! Very useful and worked like a charm!! Good job!
ReplyDeleteYou're most welcome, Jen sako! Great to know you're delighted and thanks for positive feedback.
ReplyDeleteThanks that is absolutely awesome! Such a neat solution I am really really pleased; it was super easy too.
ReplyDeleteHooray! Thanks a million times a million! I love it!
ReplyDelete@ Jennifer - My pleasure! Lovely to know you're absolutely pleased with the results. Thanks for letting me know.
ReplyDelete@ Charli - Thank you for your exuberant appreciation and being a follower. You've made my day! :-)
It worked beautifully. Thank you!
ReplyDeleteThanks for your appreciation, Foofuhdu! Nice to know it's working fine for you.
ReplyDeletethanks! I used it on my blog as well!
ReplyDeleteYou're most welcome, Sarah!
ReplyDeleteThanks - In this method, I can see that blog archive had been built using JSON (JavaScript Object Notation) & blog feed. Accessing of blog feed is done by using a technology called JSON through a callback.
ReplyDeleteIf you would like to remove "Abu Farhan", you'll have to host it in your own site/blog.
Disadvantage: If you have a very huge list of posts, this technique is not effective! All your years of posts (1000's) would load in a single page which may slow down or even freeze the page. There should be some functions/features/controls in this JSON query by Abu Farhan. Wish you all the best - Thank you
Awesomeness!!!
ReplyDeleteThanks so much for sharing!!! :)
ReplyDeleteJust what I needed. :)
@ Anonymous - Thanks, but too technical for me to comprehend! :)
ReplyDelete@ MK - Thank you for your kind compliment!
@ Eizu - My pleasure... I enjoy sharing. Glad you're delighted!
thank you so much for this clear and helpful post!!! It worked great for me on my site.
ReplyDeleteI really appreciate it.
Andrea
www.piebirds.org
You're most welcome, Andrea! Thank you for taking the trouble to pen your thoughts and appreciation. You've made me happy reading them. :)
ReplyDeleteI've just now started to use static pages on my blog, and truly appreciate this information. It makes a wonderful archive page.
ReplyDeleteThanks for your positive feedback, Boomer! Great to know you like it!
ReplyDeletenice! faster & better than bloggersentral.com solution which uses yahoo pipes.still slower than blogger's archive widget...
ReplyDeleteSeems the best solution for an archive page with full titles... keep going!
You are so kind and generous to write this post for a toc. Thanks for your brains, persistence, and kindness.
ReplyDelete@ Anonymous
ReplyDeleteThanks for your kind comments!
@ Mary Dixon
You've made my day with such sweet words that brought a smile to my face! This itself is reward for sharing my knowledge. Thank you very much, Mary! :)
Thank you! After trying several other different methods (all unsuccessful) to create an archives page, this one actually worked... and so simple too!
ReplyDeleteYou're very welcome, Andrea Brand! Appreciate your positive comment... thank you!
ReplyDeleteThank you! Thank you! Thank you! From a technologically-challenged blogger who had to have my 11-year-old daughter help me set up my Facebook page.
ReplyDeleteYou're most welcome!
ReplyDeleteI'm happy for you.. if there's a will there's a way! Learning is fun, right? Before long, you'll be proficient. All the best! :)
This was so easy. Wow. Thank you so much for sharing. Appreciate it.
ReplyDeleteGillian
You're very welcome, Gillian! Thanks for taking the trouble to show your appreciation.
ReplyDeleteThank you for sharing this link. I've been trying to work out for a while how to do this and had no luck until I stumbled across your page. Thanks. :D
ReplyDeleteYou're most welcome, Clare. Great to know that.
ReplyDeleteBRILLIANT!!!! You are my new best friend!
ReplyDeleteThanks for your kind comments, Denise R. Much appreciated. :-)
ReplyDeleteJac: I am wondering, after I have the table of contents on my Blog, how do I post them accordingly? Do I label them? Please forgive my illiteracy... I want to index all my Topics and I have staic pages, and found that I can not have mulitple posts on a page, So I have been trying to figure out how to post in Something Like a Table of Content or Index or something to Categorize the posts I need to for Easy Finding for the Things I need to do... I think your Table of Content Is what I need, but I need to know now how do I post into the Different Categories Using your Table Of Content .. And... How many Categories Can your Table Of Content Hold? Again Thanks and forgive my stupidity, I am new on all of this and it is abstract for me
ReplyDeleteThis comment has been removed by the author.
ReplyDeleteHi! My post feed is redirected to FeedBurner, so I can't replace it with my blog url because the page doesn't exist. What do I do?
ReplyDeleteKrishna, please post your question to Google FeedBurner at http://www.google.com/support/feedburner/
ReplyDeleteHi Jacqueline! wonderful post - I arrived here looking for how to create an archives page for my blog. The code works fine - but I've got a problem. It only shows posts from Dec 2007. Now - don't laugh - I started my blog in 2003. :-) Any way to tweak this so everything will show up from July 2003? Thanks! I am waiting for your response.
ReplyDeleteThanks, Vidya Sury!
ReplyDeletePlease post your enquiry to Abu Farhan, the author of this hack... link already included in my article above.
Hi P.Development!
ReplyDeleteRevisited my previous response to you dtd. Nov 15, 2011 5.25 PM and detected an error in link provided but unable to edit it. Hence, deleted it and republish the following with corrected tutorial link:
I think what you need is not an Archives Page but a Sitemap Page with all your posts, sorted by labels or similarly known as categories.
Check out my relevant tutorial at http://jacqsbloggertips.blogspot.com/2010/05/create-table-of-contents-or-sitemap-for.html. However, you would first need to label all your posts for the Sitemap Page to work.
Hope this helps.
Thanks so much. This is the simplest fix I have found. The sitemap works like a charm.
ReplyDeletezombiemib.com
You're most welcome, RGC2005. Thanks for positive feedback.
ReplyDeleteThank you for posting! Worked perfectly.
ReplyDeleteMy pleasure, tinseltine.com! Great to know that.
ReplyDeleteThis works! Thanks.
ReplyDeleteI have been looking for this for years! Thanks!!
ReplyDelete@ tk & Jenny:
ReplyDeleteThanks for positive feedback... very much appreciated!
THANKS SOOOOOOOOOOO MUCH! This is the easiest and most foolproof way to add archives as a tab on the top menu bar!!
ReplyDeleteThank you ever so much, it works a treat and it was just what I was looking for.
ReplyDeleteKeep on the good job you are doing!!!
www.4everasia.com
@ Style-Delights & Anonymous:
ReplyDeleteGreat to know that you're both delighted with the end result. And I'm appreciative of your feedback... thanks a lot!
I've been looking for a TOC that lists posts by month for a while now, and this works excellently. Thanks!
ReplyDeleteI'm so happy for you, EAL! Thanks for taking the trouble to pen your appreciation.
ReplyDeletePerfect!
ReplyDeleteJust what i needed - thanks!
rachel
Hooray after a long time find this script thanks for this awesome script, it works like charm check it
ReplyDeletehttp://www.tekleisure.com/p/quick-archive.html
Lucy and Abhishek -
ReplyDeleteGlad to know you're both pleased with the outcome!
Thanks for the tutorial - works just fine :)
ReplyDeleteMy blog has over 500 posts however and I would like all to be displayed.
I've changed the number 500 to 750 in the script, but this does not change the number of posts displayed.
Any idea if it is possible to show more than 500 and how to do this?
Thanks
Hi Ingrid,
ReplyDeleteGreat to know it worked fine. Sorry though that I'm unable to help fulfill your wish to show all your posts. Please post your enquiry on how to increase posts above 500 to Abu Farhan, the author of this hack... link already included in my article above.
In case someone finds out how to increase the 500-post limit, please share the trick here!
DeleteI've just started my blog, but I would like to hit that number of posts soon or later :)
really man ur blog is awsme..it's reaaly hlped me alot
ReplyDeleteGreat to know. Thanks for the thumbs up, Vishal!
ReplyDeleteSo much more straightforward than all the other articles I've found! Thank you :).
ReplyDeleteYou're most welcome, Christopher! Thanks for your positive feedback.
Deletefabulous finds! thank you sooooo much! I've been looking for this for so long. I'm happy my search ends here. keep up the good job!
ReplyDeleteThe pleasure is all mine, Honeybee! I'm happy for you too and thanks for your encouragement. :)
DeleteThanks so much! It is exactly what i need it! A way to find easily one of my post, for me or for somebody else.
ReplyDeleteIs this going to stay on top of all post or is going to be somewhere according to the date published?
I am not good in computer programing and your explanation was so easy!
CAN YOU HELP ME TO HAVE MY POSTS ONLY THE BEGINNING AND THE REST CAN BE SEE ONLY IF YOU CLICK IN next????
ILIBILI.BLOGSPOT.COM
You're most welcome, Ileana! If you create it as an Archives Page (which is a static page not a post), then you can position the Page gadget to be below your blog's header or at the sidebar. Check out my other tutorial on Create Pages @ http://jacqsbloggertips.blogspot.com/2010/07/create-pages-in-blogger-blogs-with-ease.html for further info.
DeleteI have searched all over the web all day for something that actually works.
ReplyDeleteI cannot thank you enough, I was just about to give up after tearing my hair out- your idea worked brilliantly!
I will recommend this to anyone who enquires!
Many thanks!
The pleasure is all mine. I love sharing and if it has put a smile on someone each day, that is my reward!
DeleteThanks for your lovely thoughts and appreciation... you've made my day too! :)
Best and easiest way to put an archives page on blogger and works a treat too, Cheers for the information, really apreciate it.
ReplyDeleteThank you, tvcork!
DeleteThis stopped working on my blog a couple of days ago. Any idea why?
ReplyDeletehi jacqueline.i used this code and it wonderfull in both firefox and chrome. but i currently it dosnt work in firefox..chrome seem fine. something weird happened.
ReplyDeletei donno..can you configure it? many thanks :)
I found this post the easiest! Thanks!
ReplyDeleteYou're most welcome, cinta!
DeleteThis was an incredible help. Thank you!
ReplyDeleteGreat to know. Thanks.
Deletethank u
ReplyDeleteYou're very welcome, Sasidhar!
DeleteAwesome-worked like a charm on my blog!
ReplyDeleteDelighted to know, Amber! Thanks.
DeleteSo helpful. Thanks!
ReplyDeleteGreat to know, Kristen. Thanks for taking the trouble to convey your appreciation.
DeleteThank you for your clear explanation. I've just created my "Archive" page in my Blogger blog. Abu Farhan's script works like a charm :)
ReplyDeleteI think it should be made a default option by Blogger, though!
You're most welcome, Sem. Great to know you're delighted with the result! :)
DeleteSo so helpful! Thank you so much!!
ReplyDeletex
Thanks for the positive comment, Natalia!
DeleteAnother happy customer here! Many thanks for the tips and tricks.
ReplyDeleteCheers and all the best..
Great to know that, Antony! Thanks for your appreciation.
DeleteCheers!
Thank you, I also put it on my blog. Impressive tricks, I like it
ReplyDeleteYou're most welcome, I enjoy sharing, Anna! Thanks for the thumbs-up.
DeletePerfect! Thanks very much
ReplyDeleteDelighted to know that, BEFWales! Thanks for your kind comment.
DeleteThanks
ReplyDeleteOfftopic: You replied every comments; That's really amazing! Thanks again.
You're most welcome, Jewel! That's the least I can do to show my appreciation to commentators who have taken the trouble to pen their thoughts. :)
DeleteThanks so much! Used it on my blog.
ReplyDeleteI enjoy sharing, Paperlikes! Happy to know you've found the tutorial helpful.
DeleteDid you imagine you'd be helping people 2 years after you wrote this? Well, you are. Thanks for sharing - I just added an Archives page (and was able to remove that ugly bullet-point style list from the sidebar. :)
ReplyDeleteHappy to know that, Chris! Thanks for your positive comments.
Deletegreat information! totally useful for old and new bloggers like me :) thanks a lot.
ReplyDeleteGreat to know that, Shun! And, thanks for your appreciation.
DeleteThank you Jacq! I just love this gadget. So much, in fact, that I've shared it with my readers. Terrific!
ReplyDeleteDelighted to know you're happy and have shared your joy with your readers, Monda. Thanks for your thank you!
DeletePerfect! Best instructions I found. Now I need to figure out how to do the same thing, but for my labels.
ReplyDeleteThanks for the much appreciated positive comments, Laura!
DeleteThanks Jacq for sharing! Looks really nice in my blog =)
ReplyDeleteYou're most welcome, Jerome. I'm delighted that you're pleased with the results.
DeleteHappy blogging! :)
thanks a tonn..you saved my day..thanks again.
ReplyDeleteHi Shreya! Thanks, you've made my day too with your appreciation.
DeleteCheers!!
THANK YOU! You are a big help!!! More blessing your way!
ReplyDeleteThank you so much for your appreciation, kind thoughts and blessings, Sanna!
DeleteGod's abundant blessings to you too!
Nice Info...
ReplyDeleteVisit here : http://www.vicshare.web.id/
Thanks, Vickry!
DeleteThank you for the script info, Just updated my blog site... myfolktails.blogspot.com
ReplyDeleteYou're most welcome, Teryl!
DeleteThank you so much! Been pulling my hair out trying to update my blog design, but this has made me so happy. :')
ReplyDeleteThe pleasure of sharing is all mine, Swan Queen! Great to know you're happy. :-)
DeleteAwesome! Thanks for this. I'm using this on my blog now. :)
ReplyDeleteThanks for your appreciation and nice feedback, Leah. Great to know you're delighted!
Deletethanks so much for this! it was the easiest thing and now i have less sidebar clutter. much <3 !
ReplyDelete